With webWorkshop, you can provide your customer with traditional paper-based quotes, or you can provide an engaging fully online estimate approval process where your customers can receive and approve quotes on their phone or PC.
Note: Some of the steps of creating an Estimate follow a similar process to creating a job (e.g. adding postings, sections, text, customer and vehicle). If you're not already familiar with that process, we recommend you start with the following KB before moving on to Estimates: [webWorkshop] Adding a new Job
TABLE OF CONTENTS
- Creating an Estimate
- Converting Estimates from a Recommendation
- Sending Estimates via SMS
- Sending Estimates via Email
- What your customer sees
- Converting Approved Work to a Job
- Manual Approvals
Creating an Estimate
You will find Estimates under the Workshop dropdown menu:

The first screen you will see is the Estimate list, showing any previously created estimates. It is similarly laid out to the WIP and Invoice lists, with the exception of the status icons on the right-hand side. If you hover the mouse over an icon, a tip will display explaining what the icon represents: To start a new Estimate, simply click the add icon:
Time Saving Tip: You can quickly create an Estimate from within a Work in Progress job, by clicking the Estimate icon at the bottom of the job. This will create a new Estimate and bring across the customer and vehicle info from the original job:

From this point, preparing an Estimate is a very similar process to creating jobs; essentially you select a customer and vehicle, then add parts and labour to the postings:

However, here are a couple of important factors to be mindful of:
Estimate Expiry Dates

When you create an estimate, the Expiry date is automatically set to one month from the current date. In the Customer Approval portal, customers will only be able to accept estimates that have not expired.
You can edit the Expiry date at any stage, and the customer will then be able to approve that estimate using the original estimate approval link they have been sent, you can re-send the estimate to the customer for convenience.
Job Templates & Job Sections are key to building your estimates.
The online estimates approval process summarises the estimate into separate sets of work that can be individually authorised or declined. These sets of work are grouped by each Job Section within the estimate (Job Templates are automatically placed into their own job section).
For more information on Job Templates and Job Sections please see the following KB articles:
- Job Templates
- Job Sections (including how to add images to a section!)
A great way to use this to your advantage is to add optional or suggested work to the Estimate in a specific job section, so the customer can choose to proceed with this work when authorising the job. You can see how this looks (including Mobile Images added to the Estimate) in the What your Customer Sees KB article
Converting Estimates from a Recommendation
Estimates can easily generated from the Recommendations feature where techs to log recommended work using the Technician Web App from a mobile device. Read more here:[webWorkshop] Adding Recommendations from a Mobile Device
Sending Estimates via SMS
Click the SMS icon beside your customer's Mobile number in the Customer Details section of the Estimate:

This will present a message preview screen where you can modify the SMS message if necessary (do not change the URL link or your customer will not be able to open the link to the Estimate). Click Send to send the message.

Sending Estimates via Email
To send your Estimate to the customer, click the dropdown arrow beside the Printer icon at the top left of the Estimate screen:

Then click the Email option on the following window :

The next window to display will provide the option to check the recipient email address and view/modify the content of the message that will be sent - simply click the Send button when you're ready to proceed:

What your customer sees:
For an example of what your customer will experience from their end of the Estimate approval process; please see the following KB article:
IMPORTANT NOTE: Once your customer has approved an estimate, they can only view a read-only copy of the estimate. If they need to amend their choices, they should use the Contact Us button, so you can manually edit the Estimate approvals.
Converting Approved Work to a Job
For instructions on how to convert work authorised by your customers online to a job, please see: [webWorkshop] Converting Approved Estimates to a Job
Manual Approvals
If your customer is not going to use the digital/online estimate acceptance process, you can manually approve the estimate and convert it to a job by hovering the mouse over the Create Job icon at the bottom of the estimate and selecting to either Convert to New Job or Convert to Existing Job:
If choosing Convert to Existing Job you will first be shown a list of current jobs to select from. Once selected you will proceed to the Authorise Estimate screen shown below.
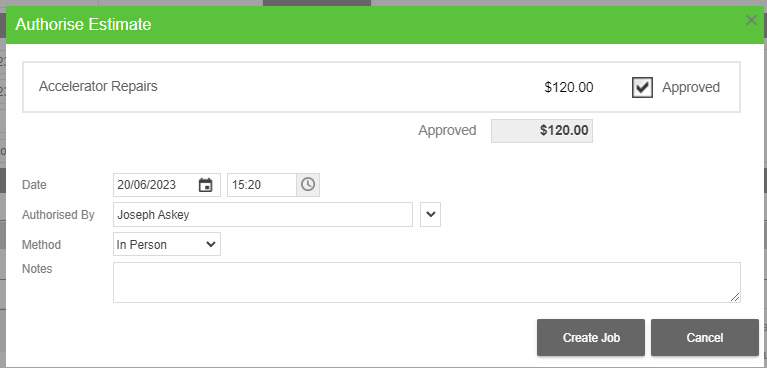
Here you can tick the Approved box beside each job section you wish to carry forward into the job, then click Create Job when you are ready to proceed, and you will be taken to a Job Work in Progress screen with all the customer and job details carried forward from the estimate.