
SalesConnect lets your team create Sales Quotes from a lead, send them to customers for approval, and convert approved quotes into deals. This article covers the full workflow from quote creation through to deal conversion.
TABLE OF CONTENTS
- Before You Start
- Where Quotes Can Be Created
- Completing the Quote
- Managing Quote Status
- Sending a Quote to a Customer
- Customer Approval Process
- Converting an Approved Quote to a Deal
- Editing a Quote
- Quote Variant
- Permissions Reference
Before You Start
- SalesConnect must be active within the Orion Sales module
- The user must have access to the Sales module and be linked to a salesperson
Where Quotes Can Be Created
Sales Quotes can be created from three locations.
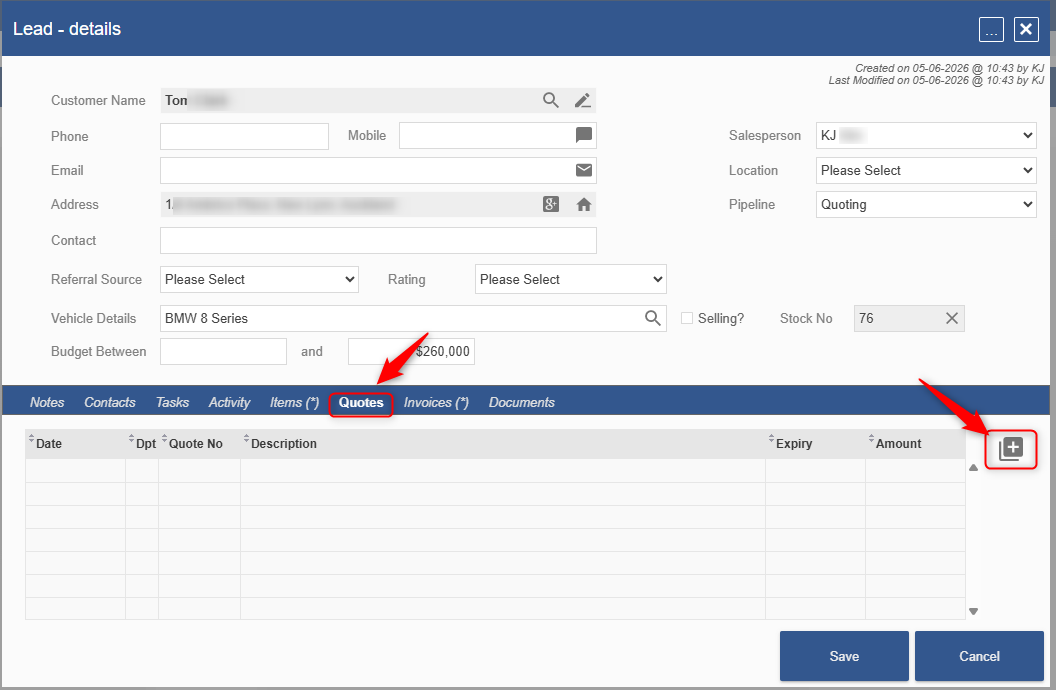
From the Lead Details Page
- Go to Sales > Lead Board
- Open an existing lead or create a new lead
- Select the Quotes tab on the Lead Details page
- Click the + icon to create a new quote
From the Sales Dashboard
- Go to Sales Dashboard
- Locate the relevant lead under New Leads
- Open the lead to access the Lead Details page
- Select the Quotes tab
- Click the + icon to create a new quote
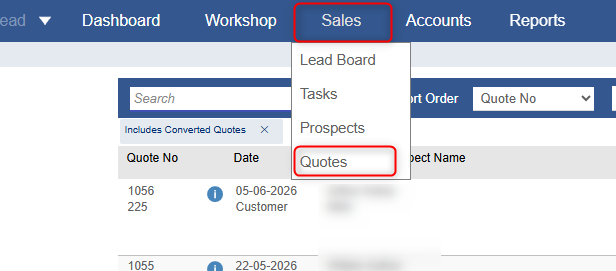
From the Quotes Menu
- Go to Sales > Quotes
- Click Create New Quote
Completing the Quote
Once the New Sales Quote screen is open, follow the steps below regardless of how you got there.
Complete the Quote Header
- Review or enter the customer details at the top of the quote
- Add a description or reference for the quote if required
Add Line Items
- Click Add Line
- Select the item type required: Stock/Sales Item & Accessories, Trade, Parts, or Deal Charge
- Search for the required item and select it from the results list
- Click Select
- Review or update the line details as required
| Field | Description |
|---|---|
| Type | Sales Item, Trade, Part or Charge |
| Code | Item code or part number |
| Description | Item description |
| Quantity | Quantity being quoted |
| NET (List) | Net value |
| Value (Charge) | Total line value |
| Line Discount | Discount applied to the line, where permitted |
- Click Save to confirm the line
- The item appears under Sales Quote Postings
- Repeat for any additional line items
Attaching Images (Optional)
Images can be attached to a quote line:
- Select the Upload Images button
- Select the files to import, drag and drop the files, or take a photo if using a tablet
Images can be renamed, have notes added, and have their display order changed.
Save the Quote
- Review all line items, pricing, discounts, and totals
- Click Save & Exit
The quote is saved and linked to the relevant lead.
Managing Quote Status
The quote status shows where the quote is in the sales process.
| Status | Meaning |
|---|---|
| Draft | Quote created but not yet sent |
| Sent to Customer | Quote sent to the customer |
| Approved by Customer | Customer has accepted the quote |
| Declined | Customer has declined the quote |
| Converted to Deal | Quote has been converted into a Deal |
Sending a Quote to a Customer
- Open the relevant lead and go to the Quotes tab
- Open the quote to be sent
- Click the Email icon, or select the available send option
- The Send Email window opens
- Confirm the customer email address
- Review the default email template and make any required changes
- Open Attach files and select any images to include as attachments with the email
- Click Send
After the quote is sent, the quote status displays Sent to Customer.
Note: The communication is recorded against the customer's Activity Listing for a historical record.
Customer Approval Process
The customer receives an email containing an Accept / Decline link.
Note: the approval link must be added to the Sales Quote communication template for both email and SMS types.
- The customer opens the quote email
- The customer clicks the Accept / Decline link
- The link opens the Sales Quote Approval page, showing the quote details, any attached images, and the total and balance
- The customer selects Accept or Decline
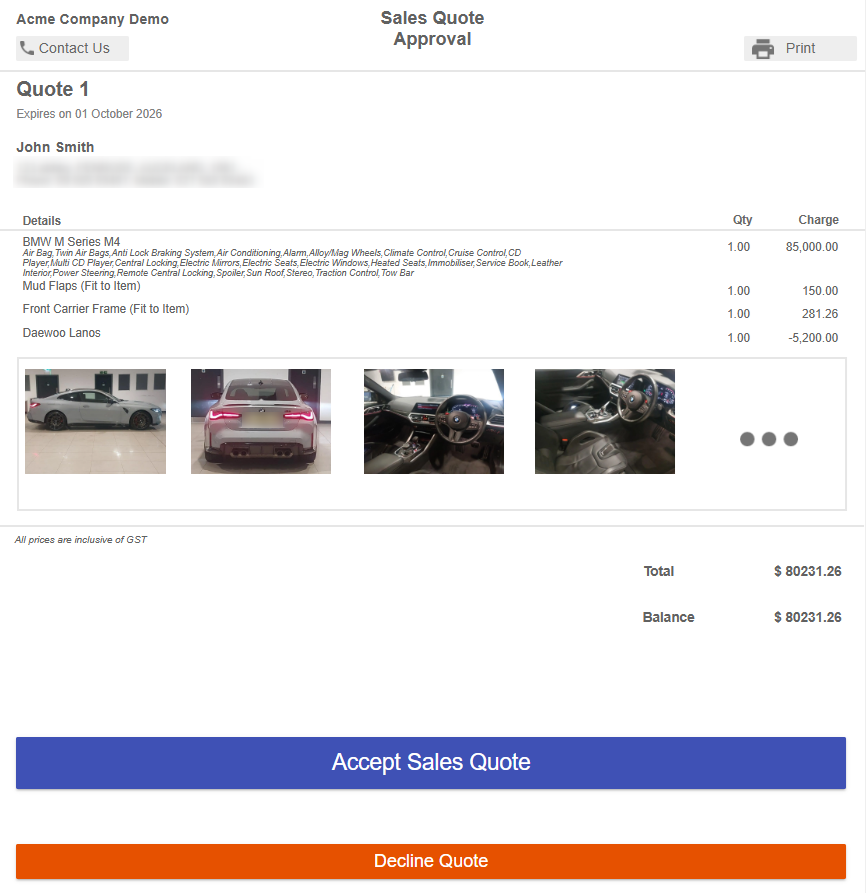
If the customer selects Accept:
- The Authorize Quote window is displayed
- The customer clicks Authorize
- A quote approved confirmation is shown
- The quote status changes from Sent to Customer to Approved by Customer
Important: The approval link is single-use. If the customer opens an old or forwarded link, the approval may not process correctly.
Converting an Approved Quote to a Deal
Once the quote status is Approved by Customer:
- Open the approved Sales Quote
- Hover over the Save & Exit button
- Select Convert to a New Deal when it appears
- The Convert Quote to Deal window displays; confirm the Delivery Date, Department, and Cost Category
- If the quote includes a non-stocked sales item, a Missing Data prompt asks you to select the Supplier for that item
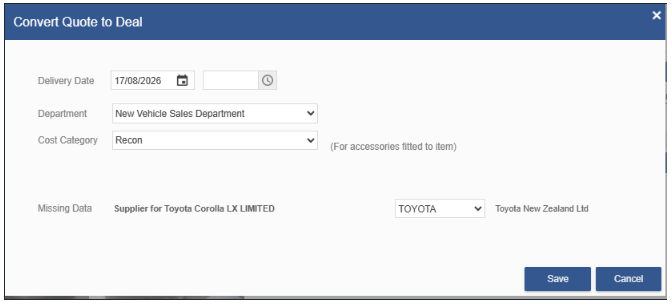
Note: A workshop service order and sale item order can be automatically created during this step.
- Click Save
- Confirm the Deal has been created successfully
The quote is converted into a Deal, and the sales process continues through the normal Orion Deal workflow.
Editing a Quote
Quotes can be edited before customer approval.
- Open the lead and go to the Quotes tab
- Open the required quote
- Make the required changes
- Review totals and line items
- Save the quote
Note: Once a quote has been approved by the customer, editing may be restricted depending on your permissions and configuration.
Quote Variant
A user may want to provide a variant of an existing quote to the customer without editing the original.
- Open the required quote
- Hover over Save & Exit and select Copy Quote
- Select the same customer and confirm
- A duplicate quote is created with a new number; make the required changes
- Review totals and line items
- Save the quote
Permissions Reference
| Function | Salesperson | Manager |
|---|---|---|
| Create Quote | Yes | Yes |
| Edit Quote | Yes, where permitted | Yes |
| Change Quote Status | Limited, configuration dependent | Yes |
| Delete Quote | No | Yes |
| View Own Leads | Yes | Yes |
| View All Leads | No, unless permitted | Yes |
| Override Discount Limits | Configuration dependent | Yes, where enabled |
| Convert Quote to Deal | Configuration dependent | Yes, where enabled |
Didn't find what you were looking for?
Our Support team are here to help, you can reach us by submitting a support ticket
or calling us on 09 583 2455