
Import parts order lines from a supplier CSV or Excel file, review them in Orion, and create missing stock items before updating the Purchase Order. This reduces manual entry for large supplier orders.
Before you start
Have a Purchase Order for the correct supplier and Branch. The import is accessed from an order, so Orion uses that order's supplier context.
Prepare a CSV or XLSX file using the column layout below. For XLSX, put the import data on the first worksheet; multiple worksheets are not supported.
For hosted Orion, use CSV where possible. The hosted environment uses LibreOffice as its default spreadsheet application.
Have the relevant Analysis Group keycodes ready for any new stock items.
Optional setup: automatically allocate barcodes
If the dealership wants Orion to generate a barcode based on the part number when a part is added to stock, enable Auto Allocate Barcodes? in the relevant Parts Department setup before adding the parts.
Open Parts System Setup for the relevant Parts Department.
Select the Stock (2) tab.
Tick Auto Allocate Barcodes? and select OK to save.
With this option enabled, Orion automatically generates the barcode from the part number when the part is added to stock. This can be used with the import screen's Add To Stock and Add All Tagged To Stock options. Printing labels remains a separate, optional step for sites with label printers.
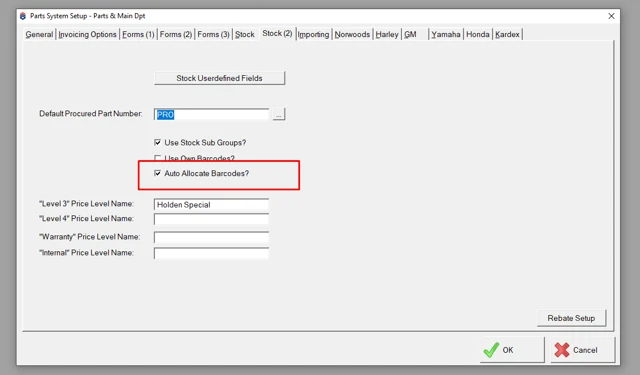
Enable Auto Allocate Barcodes? to generate barcodes based on the part number when adding parts to stock.
1. Set up the supplier import folder
Orion looks for CSV and XLSX files in a separate folder for each supplier:
..\PartsOrders\<Supplier Keycode>
For example, files for supplier keycode AUTOSURE go in:
..\PartsOrders\AUTOSURE
Use the supplier's Orion keycode as the folder name. You can create the folder manually, or open the Import function to create it automatically, then copy the file into that folder.
The path above is relative to the Orion installation. If you are unsure where it is on your local or hosted system, ask Support to confirm the full location. Files must be accessible to the environment where Orion is running.
2. Prepare the file
Keep the following column order. Preserve part numbers and supplier part numbers as text so leading zeros are retained. The descriptions below explain the column purposes; they do not define additional validation rules.
Position | Column | Content |
|---|---|---|
1 | PartNo | Orion part number. |
2 | Supplier PartNo | Supplier part number. |
3 | Part Description | Description of the part. |
4 | Qty | Quantity for the line. |
5 | Cost | Unit cost. The sample uses quantity 2 and cost 20 to give a total cost of 40. |
6 | Retail | Retail selling price. |
7 | Analysis | Analysis Group keycode. An Analysis Group must be supplied or selected when creating new stock items. |
8 | Date | Line date. The supplied sample uses DD-MM-YYYY. |
9 | OrionOrderNo | Orion order number. This is blank in the developer's sample; the import is opened from an Orion order. |
10 | SupplierOrderNo | Supplier order number or reference. |
11 | Reference | Additional reference. |
CSV layout example (based on the developer's sample, with header quotation marks normalised):
"PartNo","Supplier PartNo","Part Description","Qty","Cost","Retail","Analysis","Date","OrionOrderNo","SupplierOrderNo","Reference"
"PART1","SUPPART1","Part1 Description",1,10,15,"","27-08-2026","","123-1","Ref1"
"PART2","SUPPART2","Part2 Description",2,20,30,"","29-08-2026","","123-2","Ref2"
The sample leaves Analysis blank. Select the appropriate Analysis Group during stock creation if one is not provided in the file.
Check duplicate lines before importing. If the same part appears on several lines, Orion keeps those as separate order lines and they must be received separately. Merge duplicates where appropriate before importing, while preserving any differences that need separate lines.
3. Open the import
Open the relevant supplier Purchase Order.
If Order Central or Sprint3 is active, right-click in the order lines area and select Generic Import from the menu. Otherwise, use the Import button displayed on the order screen.
In the Generic Ordering screen, select the required file from the Orders list after saving it in the correct supplier import folder.
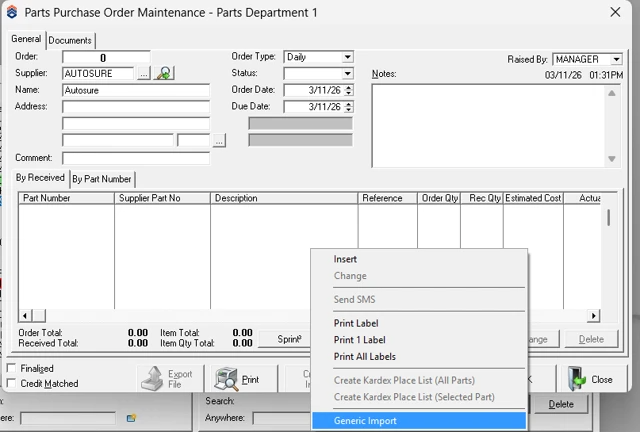
With Sprint3 enabled, right-click in the Purchase Order lines area and select Generic Import.
4. Review the lines and create missing stock items
Check the supplier and select the file to import from the Orders list. Its lines appear in the Details list below.
Review part numbers, descriptions, quantities, unit and total costs, markup, prices and the proposed Action for each line.
Use Order Type to change a line's order type to Stock, Job, POS or Expense, as required. Check the resulting Order Type column; the example below shows lines assigned to W/S Job 3237.
Use Pricing to set the markup, then check the Markup and Price columns.
Use Tag/Untag, Tag All or Untag All to choose the required lines. A Y in the first column identifies a tagged line.
For missing stock items, use Add To Stock for an individual part, or tag the required lines and select Add All Tagged To Stock. Supply or select an Analysis Group when creating the stock items.
Check the destination order and Action column, and resolve any validation messages before creating or updating the order.
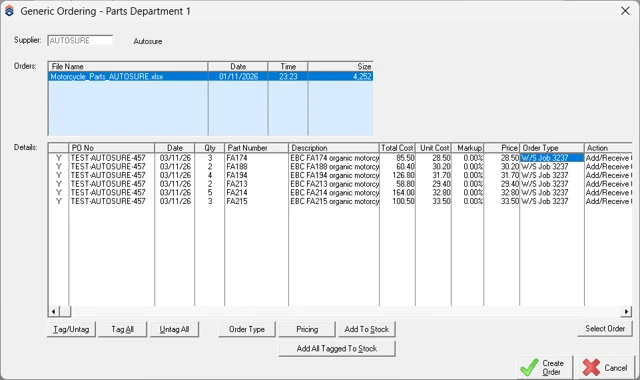
Select a saved supplier file, review its lines, change Order Type and Pricing, and tag parts to add to stock. This example shows Job lines with 0.00% markup.
5. Update and check the order
Select Create/Update Order (labelled Update Order in some screens) to process the selected lines.
Allow the process to finish. A Working screen may appear; do not interrupt processing.
The import screen closes and returns you to the order.
Check the resulting order lines, quantities, costs and totals against the source file before continuing the normal order workflow.
The import preview shows the intended action for each line, which may include adding or receiving a part against the order. Review the Action column before selecting Update Order. Before importing the same file again, check whether its lines have already been applied.
6. Print labels (optional)
If you have a label printer, you can print labels from the Purchase Order after importing the parts.
Return to the Purchase Order and right-click in the parts list.
Select the required label option: Print Label, Print 1 Label or Print All Labels.
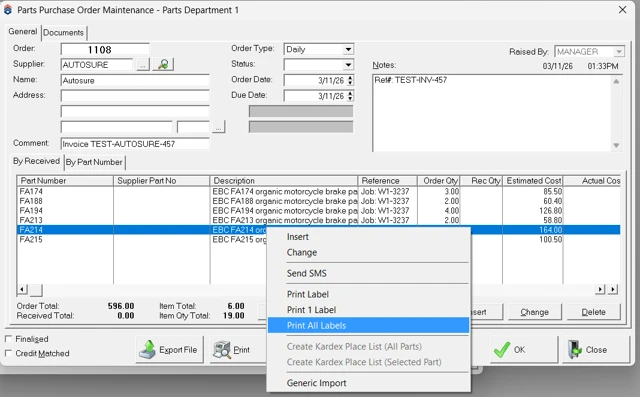
For sites with a label printer, right-click the Purchase Order parts list to access the label options. Print All Labels is highlighted in this example.
Troubleshooting
Issue | What to check |
|---|---|
No Import button | If Order Central or Sprint3 is active, use the order's right-click menu. Also confirm the installed release includes the feature. |
File is not listed | Check the CSV/XLSX extension and the PartsOrders folder for the exact supplier keycode. On hosted systems, confirm the file is saved in the hosted Orion environment's folder. |
Validation error | Correct the reported problem and review again. The implementation reports the first detailed error, so further issues may appear after the first is corrected. |
Missing stock item | Use the stock creation controls and provide an Analysis Group. |
Repeated part lines | Clean up or merge appropriate duplicates in the source file before importing. Orion does not automatically combine them. |
Unexpected text after import | Special characters are removed during import. Check the resulting descriptions and references. |